The Power Platform is a collection of low-code/no-code tools from Microsoft that enable users to build customized solutions without extensive coding knowledge. It consists of four main components:
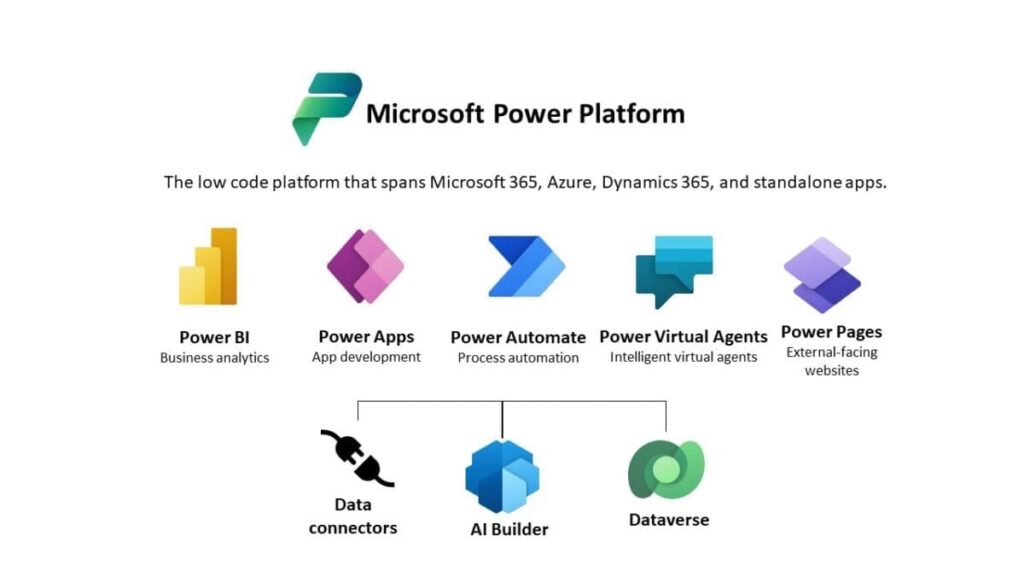
– Power BI: A business intelligence tool for data visualization and analysis. With Power BI, you can connect to various data sources, create interactive dashboards and reports, and share insights across your organization.
– Power Apps: A platform for building custom business applications. There are two types of Power Apps:
–Canvas Apps: User-friendly, drag-and-drop applications designed for mobile or tablet interfaces.
– Model-Driven Apps: More complex applications built on a data model, such as Power Apps: Project Operations which integrates with Project for the Web
–Power Automate: A tool for automating workflows and business processes. With Power Automate, you can create “flows” that connect to various services and applications, automate repetitive tasks, and streamline your processes. This is the focus of this webinar, and we’ll explore it in-depth throughout the following sections.
Power Automate is a no-code/low-code automation solution that allows you to create automated workflows across various applications and services, enabling seamless data integration and streamlined processes.
As a project manager, you juggle numerous responsibilities, from coordinating team efforts to managing deliverables and stakeholder expectations. Automation can be a game-changer in enhancing your productivity and efficiency, allowing you to focus on high-value activities while delegating repetitive tasks to intelligent workflows.
Lets explore best practices for creating well-structured and maintainable Power Automate flows, ensuring clarity and ease of understanding for both you and your team members.
# Tip 1: Delivering Clean Flows
Creating clean and understandable Power Automate flows is essential for effective collaboration and maintainability. A well-designed flow should be self-explanatory, allowing others to quickly understand its purpose and functionality. Here are some best practices to deliver clean flows:
Step 1: Rename All Actions
Rename each action in your flow with a descriptive and meaningful name. This practice helps ensure that the flow’s logic is easily comprehensible, even when revisiting it after some time.
Pro Tip: Rename actions immediately after adding them to the flow. This prevents potential issues where the flow may reference the wrong item if the action name is changed later.
Step 2: Provide Clear Descriptions
Include a detailed description of your flow’s purpose and functionality. This description should be concise yet comprehensive, allowing others to quickly grasp the flow’s intent without diving into the details.
Step 3: Organize with Solutions, Components, and Scopes
For larger and more complex flows, consider organizing your actions into logical groups using solutions, components, and scopes:
– Solutions: Containers that can hold multiple related flows, allowing you to manage them as a single unit.
– Components: Reusable building blocks that encapsulate specific functionality, promoting code reuse and modularity.
– Scopes: Logical groupings of actions within a flow, enhancing readability and organization.
Important: While solutions offer powerful organizational capabilities, be aware of their known limitations and best practices. Read more about solutions in Power Automate.
Step 4: Use Appropriate Email Addresses
When your flow needs to send notifications or emails, avoid using personal email addresses. Instead, consider using a shared email account or a dedicated “flow bot” from Microsoft Teams. This practice promotes better security and maintainability.
By following these best practices, you can create clean and self-documenting Power Automate flows that are easier to understand, maintain, and collaborate on with others.
Tip 2: Sharing Flows
Sharing your Power Automate flows with others is crucial, especially when ensuring continuity in cases where you leave the company or need to collaborate with teammates. This section covers two important aspects of sharing flows: adding co-owners and granting run-only access.
Co-owners
To ensure the continuity and ownership of your Power Automate flows, it’s essential to add co-owners. Co-owners have the ability to edit, modify, and manage the flow, ensuring that the flow remains functional even if the original creator leaves the organization or changes roles.
Co-owners have full access to edit and manage the flow, making it an essential step for ensuring that your flows are not tied solely to your account. If you’re the only owner of a flow and you leave the company or change roles, no one else will have access to maintain or update that flow.
To add co-owners to a flow:
Step 1
1. Navigate to your flow in Power Automate.
2. Click the “Edit” button.
Step 2
1. Look for the “Co-owners” section, typically located on the right-hand side.
2. Click “Add” to select users or groups you want to add as co-owners.
Best Practice: Consider adding a group or a service account (created by your IT organization) as a co-owner. This ensures that the flow can be maintained even if individual owners leave the company.
When adding co-owners, be aware that they will have access to all connections used in the flow. Review the permissions carefully before granting co-ownership. Once you’ve added co-owners, you’ll notice a subtle change in the way your flow is displayed. Instead of appearing in your personal cloud flows, it will now be listed under the Shared with me section. This is because the flow is now co-owned and not solely owned by you.
Run-only Users
While co-owners have full editing permissions, sometimes you may want to grant users the ability to run the flow without allowing them to modify it. This is particularly useful when you want to share a flow with a specific group of users or for a specific document library.
To grant run-only access to a flow:
Step 1
1. Navigate to your flow in Power Automate.
2. Click the “Edit” button.
3. Look for the “Run-only users” section, typically located on the right-hand side.
4. Click “Add” to select users or groups you want to grant run-only access.
Step 2
If your flow interacts with a specific document library or site, you can also grant run-only access directly to those locations:
1. In the “Run-only users” section, click the dropdown menu for the connection your flow uses (e.g., SharePoint).
2. Select the site or document library you want to grant access to.
3. Click “Add” to grant run-only access to all users with permissions for that location.
By granting run-only access to specific locations, you ensure that anyone with permissions to that location can run the flow, without needing to explicitly add individual users or groups.
Remember to click “Save” after making any changes to the run-only users to ensure your settings are applied.
With the ability to add co-owners and grant run-only access, you can effectively share your Power Automate flows with the right people, ensuring continuity and collaboration while maintaining control over who can edit or run the flow.